All business processes use forms. Most forms already exist and adding barcodes to them can be difficult. With VBD you will be able to:
Design barcodes to fit into tight open spaces on forms
Estimate how much space to allocate to your barcodes on new forms
Test your form by printing the barcode with the form image, and then recognizing the merged image.
Obtain a configuration string to use with your applications to add the barcode to the form
Begin by scanning the form and obtaining the image (see example below)
![]() TIP: If the form is skewed,
or otherwise not right, use the ClearImage
SDK to repair the scanned image.
TIP: If the form is skewed,
or otherwise not right, use the ClearImage
SDK to repair the scanned image.
Click ![]() to
open the image file and place it on the Image
Panel
to
open the image file and place it on the Image
Panel
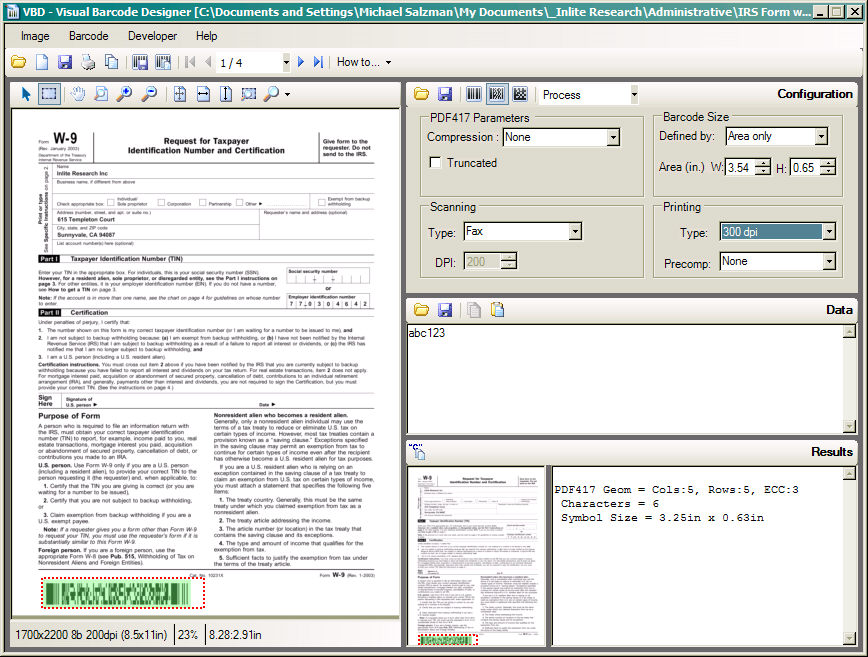
Define the configuration of the barcode
Enter the sample data in the Data Panel
In the Image
Panel, click on the region select tool ![]()
Draw the rectangular area on the image, where the barcode should fit.
![]() Tip: The Barcode
Size on the Configuration Panel will be updated with the area dimensions
Tip: The Barcode
Size on the Configuration Panel will be updated with the area dimensions
VBD will automatically place the barcode symbol in the top left corner of the area, or
Drag the active barcode to the desired location
If the barcode is not present, check the Results panel for error messages. Normally the active barcode is always displayed.
This example shows a PDF417 in the footer of the form..
You can now:
If you need to design a second barcode, click ![]() to save the image page as a file, and repeat
steps 1-9 for another barcode
to save the image page as a file, and repeat
steps 1-9 for another barcode
Click ![]() to save the
barcode image (by itself, without the large image) to a file
to save the
barcode image (by itself, without the large image) to a file
Click ![]() to copy the
barcode image to the clipboard
to copy the
barcode image to the clipboard
Click ![]() to save the
image page and the barcode together as a combined image file.
to save the
image page and the barcode together as a combined image file.
Click the Developer pull down menu, then click![]() to obtain the Configuration String
for this barcode
to obtain the Configuration String
for this barcode
Click ![]() to print the image with the barcode
to print the image with the barcode
![]() Tip:
Tip:
When you save or print the image, the barcode is automatically merged onto the image.
The resolution of the saved image is always set to 200 dpi and the barcode image is scaled to fit the image correctly by its overall size, not by its dpi
Do not use this image for production work - since the dpi is not scaled to the print resolution specified in the Printing subpanel.